Monday, August 19, 2024

W365: Case study 2 - Resize windows 365 cloud pc during Grace Period

Continuation from Case Study 1

Scenario 2:

  • The cloud pc is placed under Grace period.
  • Click on the cloud pc and click on resize option and choose another higher SKU.

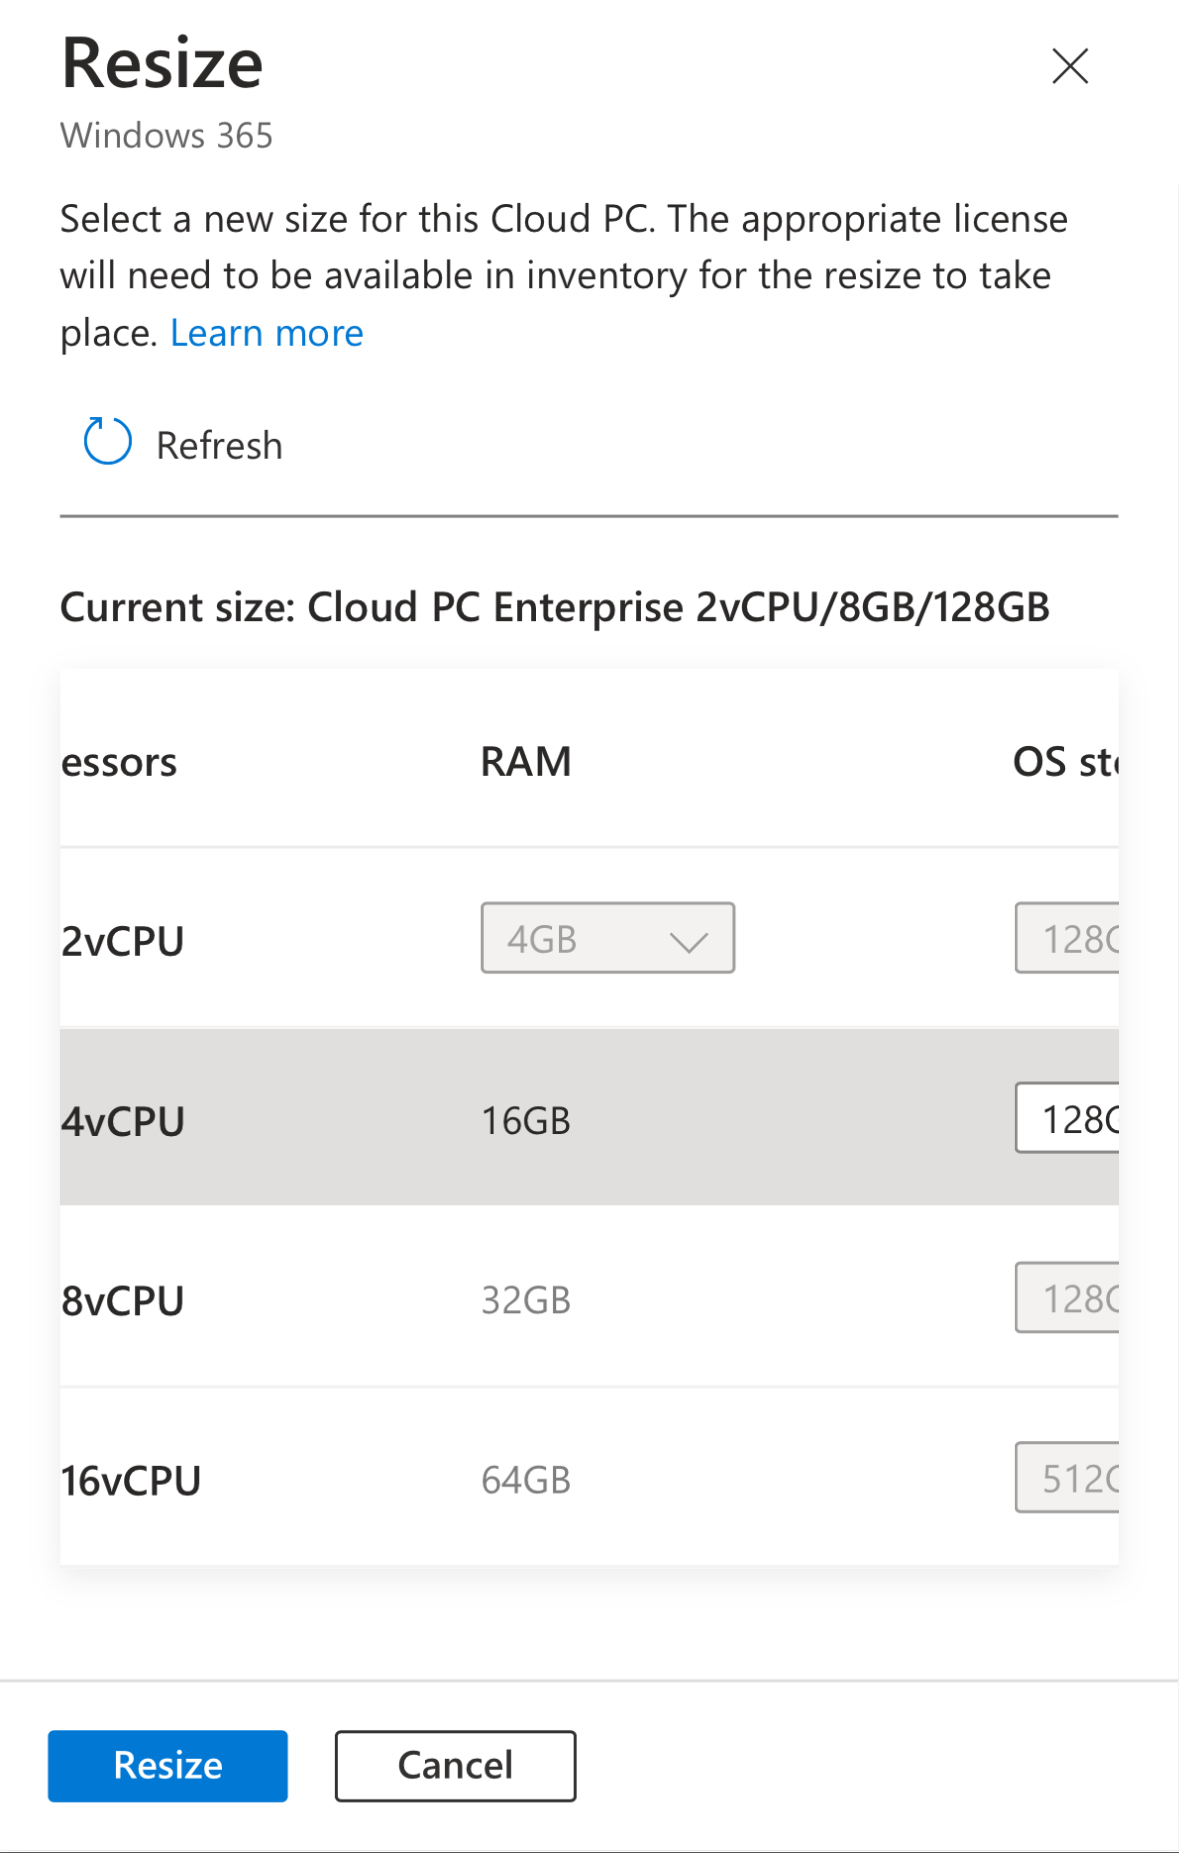
  • Click on Resize and it shows a notification that it failed with the below reason.

  • The cloud pc doesn’t move to resize pending license state.
  • The cloud pc gets deprovisioned and cloud pc is removed once grace period reaches its end time.
  • The operating system and data are deleted from the Cloud PC. The Cloud PC is no longer available.
  • Resize failed to proceed in this scenario.

Detailed background information:

If a Windows 365 Cloud PC is in a grace period and you attempt to resize it to a higher SKU, the operation will not work as intended. During the grace period, the Cloud PC is in a state where it's essentially marked for deprovisioning, and resizing is not allowed with below error message.


When a Windows 365 Cloud PC is in the grace period and you attempt to resize it to a higher SKU, the following typically happens:

1. Resize Operation Fails: The Cloud PC does not move to a "resize pending license" state because it is already in a grace period, which restricts such operations. The resize request is likely to fail since the Cloud PC is marked for deprovisioning due to issues like an expired or suspended license.

2. Cloud PC Status Remains Unchanged: The Cloud PC remains in the grace period, and no changes are made to its configuration. The system will not attempt to apply the resize until the underlying issue causing the grace period is resolved.

3. Action Required: To successfully resize the Cloud PC, you need to reinstate the user to the older SKU license or replace with a different policy, the Cloud PC will be reprovisioned with the settings in the new policy. Once the Cloud PC is out of the grace period, you can then apply the resize operation.

Note: If in Grace period, if you assign the user to higher SKU group, without going for resize option then the cloud pc will be reprovisioned with the settings in the new policy.

To ensure a smooth transition when resizing a Cloud PC, the device should not be in the grace period. If you need to resize the Cloud PC, you must first reinstate the license. This process helps to avoid any potential conflicts or issues with the Cloud PC's provisioning and ensures that the operation proceeds correctly.

Saturday, August 17, 2024

Intune & macOS: .app .pkg .dmg file is blocked by Gatekeeper

Understanding Gatekeeper in macOS and How to Bypass Its Prompts

Gatekeeper is a security feature in macOS designed to protect your system from untrusted software by verifying the source of apps, PKG, and DMG files. When you try to open a file from an unverified source, macOS may show a Gatekeeper prompt, even if the file is legitimate.

What is Gatekeeper?

Gatekeeper controls what software can be installed on your Mac, ensuring that apps are from the App Store or identified developers. It checks for a digital signature to verify that the app hasn’t been tampered with and is safe to run.


How to Resolve Gatekeeper Prompts:

If you encounter a Gatekeeper prompt despite the file being genuine, you can bypass it by checking and removing the quarantine attribute, which Gatekeeper uses to track downloaded files.

1. Check for Quarantine Attribute:
   Run the following command in Terminal to see if the file is quarantined:

xattr /path/to/App.dmg

2. Remove the Quarantine Attribute:
   If the quarantine attribute (`com.apple.quarantine`) is present, remove it by running:

xattr -dr com.apple.quarantine /path/to/App.dmg
   
   
This command removes the quarantine attribute from the file, allowing it to open without Gatekeeper blocking it.

Applying This Solution to .app, .pkg, and .dmg Files

The same process can be applied to any app, PKG, or DMG file. Simply replace the file path in the commands with the appropriate file's path on your system. This method helps bypass Gatekeeper's restrictions when you know the file is safe but still encounter warnings.

Friday, August 16, 2024

W365: Case study 1 - Resize windows 365 cloud pc during Grace Period

In a recent discussion within the Microsoft Management Customer Community Program (MCCP) regarding Windows 365, a question was raised: which takes precedence, a license's grace period on its final day or a resize pending license? This blog explores the answer through various scenarios.

You can read more about this topic, which was highlighted by Dieter Kempeneers, on his blog site.

Before to exploring the case study, kindly check the resize flow chart which Microsoft have released.


Scenario 1:

  • The cloud pc is placed under Grace period.
  • On the last day i.e 7th day morning,assign back to the sku group and then after some time click on the cloud pc and click on resize option and choose another higher SKU.

  • When you click on resize, it shows what exactly will happen and what needs to be done so that resize will happen successfully.

  • Click resize so that the cloud pc is placed under Resize pending license state.
  • By default, the resize pending license state will last for 48 hrs. But this doesn’t mean that the resize pending license will extend the grace period to another 2 days. It still honours the 7 days grace period. 
          Grace period will take precedence always.

          Grace Period > Resize pending license
  • Remove the user from older sku group and Add the user to the higher SKU license group now.
  • The provisioning will begin once the entra group is synced.
  • The cloud pc now shows resizing state.
  • The resizing will take around 20-30 mins.
  • The resizing completes successfully.
Since we initiated the resize on the last day morning of the Grace period, the resizing have completed successfully without any issues. 

Detailed explanation of the background process:

If a Windows 365 Cloud PC is in the grace period and you reassign the user to the original SKU license group during the last 7th day of the grace period and then click on resize, here's what typically happens:

1. Reassignment to Original SKU: When you add the user back to the original SKU license group, this action should reinstate the license for that Cloud PC. If the license is reinstated successfully before the end of the grace period, the Cloud PC should return to its active state.

2. Exiting the Grace Period: Once the license is reinstated, the Cloud PC exits the grace period. The Cloud PC will no longer be marked for deprovisioning and will return to normal operation with the original SKU settings.

3. Attempt to Resize: After the license is reinstated and the Cloud PC is no longer in the grace period, you can then attempt to resize it to a higher SKU.
 
    - If the conditions are met (i.e., the Cloud PC is active and has a valid license), the resize operation should initiate normally.
    - The Cloud PC would enter a "Resize pending license" state only if there’s a delay in processing the resize due to the assiging license to the higher sku group. 

In summary, if you reassign the user to the original license group before the grace period ends, and then attempt to resize, the resize should proceed as long as the Cloud PC is no longer in the grace period. If the Cloud PC exits the grace period and is active, the resize should move forward without issues.

In our next blog, we will see the scenario for our case study 2. 
Stay Tuned ๐Ÿ”œ

Update 20/08/2024  - Continue to case study 2 ๐Ÿš€๐Ÿš€


Wednesday, August 14, 2024

Intune & macOS - Comparison between macOS Line Of Business LOB PKG vs Non-managed PKG

Here's a comprehensive comparison between the requirements for deploying PKG as Line of Business LOB apps or Unmanaged macOS PKG apps.

Feature/Requirement Unmanaged macOS PKG Line of Business PKG Apps 
Non-flat Packages Supported: Hierarchical structure, typically a directory with package components inside Supported
Component Packages Supported: Allows multiple independent components to be installed separately Supported: Component package or package containing multiple packages
Unsigned Packages Supported Not Supported (must be signed with "Developer ID Installer" certificate)
Packages Without a Payload Supported Not Supported (must contain a payload). without payload, re-install will happen in loop till the app is unassigned from the group
Packages Installing Outside `/Applications/` Supported Not Supported
Custom Packages with Scripts Supported Supported
Contain Bundles, Disk Images, or `.app` Files Supported Not Supported
Signing Requirement None Must be signed with a "Developer ID Installer" certificate

Monday, August 12, 2024

Intune - Install Intune app in Red Hat Enterprise Linux RHEL 8,9

Install Microsoft Edge

First, install Microsoft Edge by running the following commands:

sudo dnf config-manager --add-repo https://packages.microsoft.com/yumrepos/edge
sudo dnf install microsoft-edge-stable
sudo reboot

Sign in to Microsoft Edge

Open Microsoft Edge browser and sign in first.

Install the Intune App

Next, install the Intune app using the following commands:

sudo rpm --import https://packages.microsoft.com/keys/microsoft.asc
sudo dnf config-manager --add-repo https://packages.microsoft.com/yumrepos/microsoft-rhel9.0-prod
curl -sSL -O https://packages.microsoft.com/config/rhel/9.0/packages-microsoft-prod.rpm
sudo rpm -i packages-microsoft-prod.rpm
sudo dnf install intune-portal

Upgrade the Intune App


sudo dnf update
or
sudo dnf update intune-portal

Uninstall the Intune App


sudo dnf remove intune-portal

Thursday, August 1, 2024

w365: Clipboard redirection now available in the settings catalog

Due to security measures, organisations will want to restrict clipboard restrictions (copy-paste) from the cloud pc to base laptop but allow copy-paste to work from base laptop to cloud pc. In this case, how can we achieve this??

The Intune July update (service release 2407) now supports the Clipboard redirection in the settings catalog.

What is Clipboard redirection?

Clipboard redirection in windows 365 cloud pc's permits users to copy and paste various types of content, such as text, images, and files, between their local device and the remote session in both directions. To enhance security and prevent potential data leaks or the transfer of harmful files, you might consider restricting the clipboard functionality for users/Device.

Administrators have the flexibility to control clipboard usage by determining whether data can be transferred from the session host(windows 365) to the client or from the client to the session host, and also specifying the types of content to be allowed. 

Pre-Reqs: Configure the clipboard transfer direction in Azure Virtual Desktop | Microsoft Learn

To do this, open Intune portal and navigate to Devices > Manage devices > Configuration > Create > New policy > Windows 10 and later for platform > Settings catalog.

In the settings catalog, open Administrative Templates > Windows Components > Remote Desktop Services > Remote Desktop Session Host > Device and Resource Redirection

The below settings options are available for both Device and User.

  1. Restrict clipboard transfer from server to client - (w365 to base device)
  2. Restrict clipboard transfer from server to client (User)
  3. Restrict clipboard transfer from client to server - (Base device to w365)
  4. Restrict clipboard transfer from client to server (User)
If you do not enable or configure these settings, then users can copy contents from device to cloud pc and vice-versa.
  1. Restrict clipboard transfer from server to client/(User)- (w365 to base device) - Not configured or enabled, users can copy paste from w365 cloud pc to the base device.
  2. Restrict clipboard transfer from client to server/(User) - (Base device to w365) - Not configured or enabled, users can copy paste from the base device to the w365 cloud pc.


If you select the User settings, then it will be applied to the user scope alone. If you select the device settings, then it will be applied to the device scope.

Note: If you have selected both the User and device settings, then the most strict restrictions will be applied to the endpoint.

In this example, we have selected the device settings alone.
  1. Restrict clipboard transfer from server to client
  2. Restrict clipboard transfer from client to server
Once you toggle the Enabled button, you can see the below options in the drop-down for both.
  1. Disable clipboard transfers from session host to client, client to session host, or both.
  2. Allow plain text only.
  3. Allow plain text and images only.
  4. Allow plain text, images, and Rich Text Format only.
  5. Allow plain text, images, Rich Text Format, and HTML only.


Now, you can select the desired options  from above and assign it to the user/device/groups in the Assignments section.

Once assigned, in the windows 365 cloud pc (Session Host), sync the device and reboot for the settings to take effect.

Powershell scripts:

https://github.com/app2pack/Windows365-Scripts

Reference: Configure the clipboard transfer direction in Azure Virtual Desktop | Microsoft Learn

If you are interested in understanding how redirection works between client ๐Ÿ’ป  and ☁  cloud pc's ๐Ÿ’ป then check this detailed article.

https://learn.microsoft.com/azure/virtual-desktop/redirection-remote-desktop-protocol