Monday, October 6, 2025

Windows 365 Cloud PC on the Go: A Seamless Experience with iPhone 15 and Dell 14” Portable Monitor

 As someone constantly exploring new ways to make work more flexible and mobile, I recently tested accessing my Windows 365 Cloud PC using the Windows App 11.0.2 on an iPhone 15, connected to a Dell 14-inch Portable Monitor (P1424H) via USB-C cable. 

The experience? Absolutely amazing.

Instant External Display Support

The moment I connected my iPhone 15 to the Dell portable monitor using the provided USB-C cablesomething incredible happened:

  • The Windows App on my iPhone went black, and the entire Cloud PC session automatically transitioned to the external display.
  • No additional configurations were needed—it just worked!

Performance and Usability

Even though I was running a Cloud PC session remotely, the performance was surprisingly smooth:

  • Microsoft Teams calls worked flawlessly—no noticeable lag or quality drop.
  • Multi-tasking felt natural, with the full Windows experience on a large screen.
  • Touch gestures on the iPhone worked as expected, making navigation easy.

Why This is a Game Changer

This test proved how Windows 365 Cloud PC is truly device-agnostic and travel-friendly. No need to carry a laptop—just a portable monitor and an iPhone:
✅ Work from anywhere—hotel rooms, cafΓ©s, airport lounges.
✅ Minimal setup—plug in and start working instantly.
✅ Full Windows experience on any screen, with external monitor support.

For professionals constantly on the move, Windows 365 + iPhone + Portable Display is a powerful combination. Just connect and use your Cloud PC wherever you are!

Have You Tried This Setup?

If you've used Windows 365 Cloud PC in a similar mobile setup, I'd love to hear about your experience! Would you consider replacing your laptop with a portable monitor and smartphone for remote work? Let’s discuss it! πŸš€

Thursday, September 11, 2025

Fixing Microsoft Teams Performance Issues in Windows 365


Fixing Microsoft Teams Performance Issues in Windows 365

Microsoft Teams is a critical collaboration tool for many organizations. However, ensuring optimal performance on Windows 365 Cloud PCs or Azure Virtual Desktop (AVD) environments often requires specific configurations. This article provides a step-by-step guide to verify and enable Teams SlimCore Media Optimization for improved performance.

Step 1: Verify Teams Media Optimization Type

Before making any configuration changes, verify that your Teams client is using the new SlimCore Media Optimization architecture. Follow these steps:

  1. Open the Microsoft Teams client.
  2. Click on the ellipsis (...) on the top bar.
  3. Navigate to Settings > About.
  4. Check the optimization type listed under the Teams version:
    • AVD SlimCore Media Optimized: means it’s new optimization based on SlimCore.
    • AVD Media Optimized: means it’s  Legacy optimization based on WebRTC.

Step 2: Enable Teams Media Optimization

To enable media optimization for Teams in Windows 365 or AVD environments, configure a registry key on each session host if it’s not already present. This key will be present if it’s already optimised. If not, you need to configure.

Registry Configuration Steps:

  1. Open Registry Editor as an administrator.
  2. Navigate to the following path:
    HKEY_LOCAL_MACHINE\SOFTWARE\Microsoft\Teams
    
  3. If the Teams key doesn't exist, create it.
  4. Add the following value:
    • NameIsWVDEnvironment
    • TypeDWORD
    • Value1


Alternatively, you can automate this process using a PowerShell script.

You can find the Powershell script in my GitHub Repository 

If Teams is not optimised, you can see a Not optimised banner at top of the Teams. You can click it and select optimise virtual desktop and restart and Teams should be automatically optimised for media audio and video quality inside windows 365.


https://learn.microsoft.com/en-us/azure/virtual-desktop/teams-on-avd#enable-media-optimization-for-teams

Wednesday, September 10, 2025

Recovering Windows 365 Enterprise Cloud PCs after license expiration (preview)

In large environments, license management isn’t always perfect. Renewals can get delayed due to procurement workflows, billing holds, or simple oversight. In Windows 365 Enterprise, when a license expires, the associated Cloud PC can be automatically deprovisioned. Until recently, once that happened, recovery options were very limited.

Microsoft has now introduced a preview capability that significantly reduces the impact of these temporary licensing gaps. If a Windows 365 Enterprise Cloud PC is deprovisioned specifically because the Windows 365 license expired, the platform retains a recovery snapshot that can be used to restore the Cloud PC after the license is renewed and prerequisites are met.

This recovery experience builds on the point‑in‑time restore capability in Windows 365 Enterprise, allowing admins to restore a Cloud PC back to a previous state instead of starting from scratch.

Real‑world example: Cloud PC removed after a license renewal gap

Consider a consulting team in an enterprise environment where multiple contractors are provisioned Windows 365 Enterprise Cloud PCs for a fixed‑duration project. Licenses for these users are purchased periodically and renewed based on procurement and finance approvals.

What happened

  • A batch of Windows 365 Enterprise licenses reaches its expiration date.
  • Due to a delay in renewal approval, the licenses are not renewed immediately.
  • As a result, one or more Cloud PCs are automatically deprovisioned.
  • The affected users log in the next day and find that their Cloud PC is no longer available.

This situation is more common than it seems and often leads to high‑priority support tickets, even though nothing was intentionally changed by IT.

Why this is painful for IT teams

Without a recovery option, IT is usually forced to provision a brand‑new Cloud PC. This involves redeploying applications, reapplying configurations, verifying access, and guiding the user to resync data from OneDrive or other backup locations. Even when everything works as expected, the user experience is disrupted and productivity is lost.

How this preview feature helps

With the new recovery capability, Windows 365 Enterprise keeps a retention snapshot when a Cloud PC is deprovisioned due to license expiration. Once the organization renews the expired licenses and confirms the Cloud PC still meets eligibility requirements, IT can restore that Cloud PC using the retained snapshot.

This approach allows the user to return to a familiar environment instead of receiving a freshly built Cloud PC. It also avoids unnecessary rebuild effort for IT teams and helps reduce downtime caused by administrative licensing delays.

It’s important to note that this feature applies only to Cloud PCs deprovisioned due to license expiration. It does not apply if a license was manually removed from a user or if the Cloud PC was intentionally deleted or reprovisioned for other reasons.

High‑level recovery flow

From an admin perspective, the recovery process typically looks like this:

  1. Renew the expired Windows 365 Enterprise license (same SKU as before).
  2. Ensure the original provisioning policy and user assignments still exist.
  3. Initiate a restore using the retained snapshot through the Windows 365 restore experience.
  4. The Cloud PC is restored and made available to the user.

This restores the Cloud PC to a known good state captured before it was deprovisioned due to license expiration.

Why this matters for enterprise IT

This feature adds an important safety net for Windows 365 Enterprise environments. Licensing gaps are often operational rather than technical failures, and this recovery mechanism helps avoid unnecessary disruption.

Key benefits include:

  • Reduced operational risk when license renewals are delayed.
  • Improved business continuity with faster user recovery.
  • Less administrative overhead compared to rebuilding Cloud PCs.
  • A more resilient lifecycle model for Cloud PCs aligned with enterprise expectations.

Tuesday, August 5, 2025

Windows 365 - Fix Microsoft Teams error code 2000


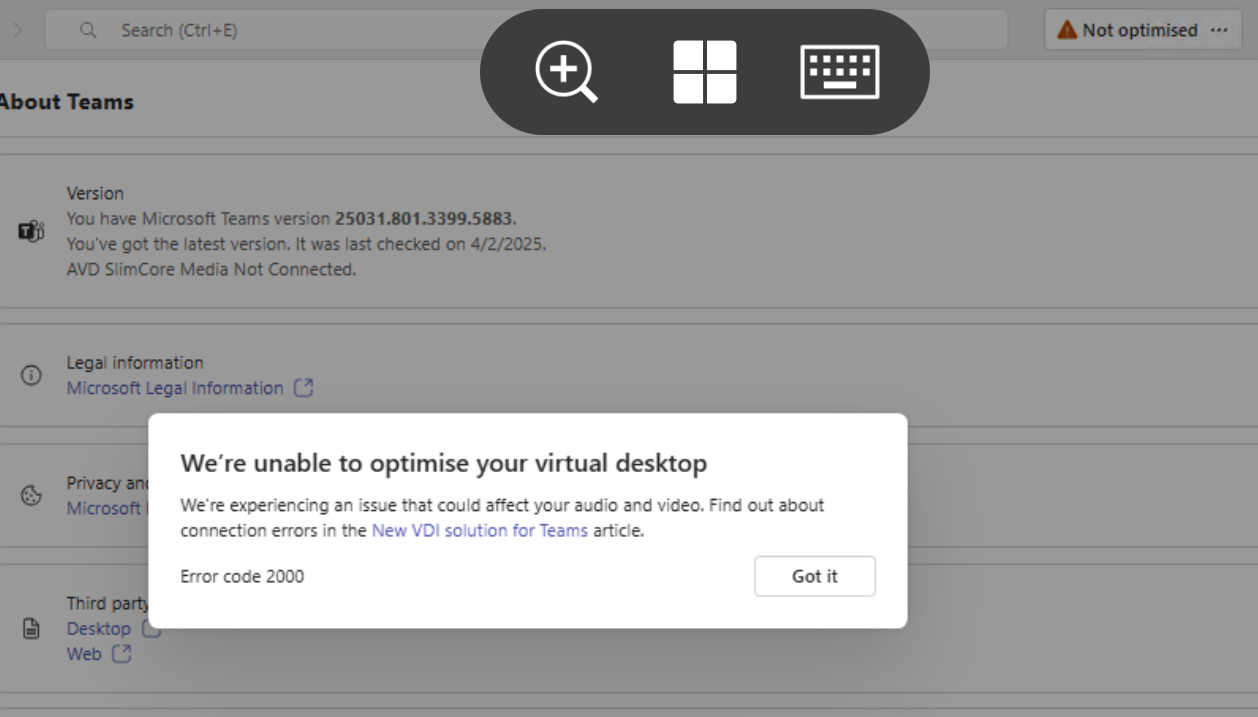
Recently I started to see Microsoft Teams showing Not Optimised banner at the top of the Teams. When clicked on it, it showed to optimize and restart. But when clicked on it, it started to show Error Code 2000. 

Checked in settings and it shows AVD slimcore media Not connected.

The error code 2000 means optimization is not enabled.

Tried to follow the steps outlined in my previous blog https://app2pack.blogspot.com/2025/02/MicrosoftTeams-Performances-Windows.html but it didn’t help. 

Followed the steps mentioned in the official MS article but it also didn’t work. Tried to force quit Teams manually and launch and still it was showing the same error and not optimized banner.

Finally Tried to restart the Windows 365 cloud pc from Windows App and this time after the restart and when clicked on Not optimized banner, it automatically optimized and prompted me to restart the Teams twice. After restarting Teams twice, the banner disappeared.