Monday, November 4, 2024

W365: Remoting connections report deprecation

Remoting connection report in Endpoint analytics will be deprecated as of December 31, 2024. It is advised to transition to the Cloud PC connection quality report to get the Cloud PC performance report.

Earlier the Remoting connection report, was used to monitor performance metrics such as Round-Trip Time (ms) and Sign-In Time (sec), which will not be available after the deprecation date.Instead you can use the Cloud PC connection quality report which shows the similar performance insights, with enhanced data points and flexibility which allows to monitor and manage Cloud PC connection quality more effectively.
 
Cloud PC connection quality report can be accessed by logging into Intune portal and selecting Devices > Overview > Cloud PC performance >View report (under Connection quality) or


Reports > Cloud Pc Overview > Connection Quality.


This report offers detailed information about:
• Round Trip Time (RTT) for the most recent or specified date range
• Available Bandwidth for the most recent or specified date range
• Remoting Sign-in Time (P50)
• Connection Gateway
• Client IP Address
• Protocol and UDP Utilization etc..


Reference: https://learn.microsoft.com/en-us/windows-365/enterprise/report-cloud-pc-connection-quality

Saturday, November 2, 2024

W365: Bulk Troubleshooting option in cloud pc’s

Earlier we had to select single cloud pc and then perform the troubleshooting steps. Recently the bulk troubleshooting option for windows 365 cloud pc’s have moved from private preview to General release.

https://learn.microsoft.com/en-us/windows-365/enterprise/whats-new#week-of-october-28-2024-service-release-2410

This bulk option will be more helpful to troubleshoot multiple cloud pc’s at a single time thus avoiding manual labour and work time.

Steps to perform Bulk Troubleshooting in cloud pc’s:

1. Login to Intune portal 

2. Select Devices - Windows Devices - Bulk Device Actions.

3. Choose Windows in OS and Cloud Pc’s in device type and click next.


4. In the Device Actions choose the desired action that needs to be performed in bulk cloud pc’s and click next.


5. In the devices page, select the cloud pc’s that needs to be added. The bulk actions supports up to 5000 cloud pc’s at a time. After selection, on the Review and create page, click on Create.

Below is the list of Bulk troubleshooting options that windows 365 cloud pc supports.

Remote actionBulk action support?
Collect diagnosticsYes
Create Cloud PC manual restore pointYes
Full ScanNo
Place Cloud PC Under ReviewYes
Power Off (Windows 365 Frontline) (preview)Yes
Power On (Windows 365 Frontline) (preview)Yes
Quick ScanNo
Remove Cloud PCs from reviewYes
RenameNo
ReprovisioningYes
ResizeYes
RestartYes
RestoreYes
Share Cloud PC restore point to storageYes
SyncYes
TroubleshootYes
Update Windows DefenderNo

Reference:

https://learn.microsoft.com/en-us/windows-365/enterprise/remotely-manage-cloud-pc

https://learn.microsoft.com/en-us/windows-365/enterprise/resize-cloud-pc#bulk-resizing-cloud-pcs

W365: How to Disable the Shutdown Option on Windows 365 Cloud PCs Start Menu

Recently my windows 365 cloud pc started to show the shutdown option in the start menu. By default the shutdown option is hidden and not visible to the end user.

This is explained in the post provisioning steps in the article - https://learn.microsoft.com/en-us/windows-365/enterprise/automated-provisioning-steps#post-provisioning-configuration

But what if suppose the shutdown button is shown in the start menu? 

In a Windows 365 Cloud PC environment, limiting certain system options can be crucial to maintaining a productive and seamless virtual workspace. One such option is the Shutdown button, which, if accessible to end users, may lead to unintentional interruptions in service and productivity. In this article, we’ll cover why disabling the shutdown option can be beneficial and walk through a quick PowerShell script to make this change via the registry.

Disadvantages of Having the Shutdown Option Visible

- Reduced Accessibility: Unlike physical PCs, Cloud PCs are hosted in a cloud environment, so when a user selects the shutdown option, the Cloud PC has to be powered back on through the management portal. This requires IT support and increases downtime.

- Increased Support Requests: Accidental shutdowns lead to additional support requests, impacting the help desk workload and creating delays for users needing to regain access.

By removing the shutdown option from the Windows 365 Cloud PC, you reduce the chances of service interruptions and support requirements, resulting in a more stable virtual environment.

How to Disable the Shutdown Option

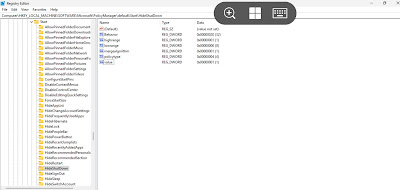
The shutdown option can be hidden by modifying a specific registry entry to prevent users from unintentionally turning off the Cloud PC. This involves setting the `Hideshutdown` value in the registry.

Registry Key Details

- Registry Path: HKLM:\Software\Microsoft\PolicyManager\default\Start

- Value Name: `HideShutDown`

- Type: DWORD

- Setting: `1` to hide the shutdown option (default is `0`)

Powershell script can be found in my GitHub repo - 

https://github.com/app2pack/Windows365-Scripts/blob/main/W365-Hide-Shutdown.ps1

Friday, November 1, 2024

W365: Move - How to Change Regions for Windows 365 Cloud PCs with Intune

As your business evolves, you may find it necessary to relocate your Windows 365 Cloud PCs to a different region. Whether it’s to improve performance, meet new data compliance needs, or align with changing organisational structures, moving Cloud PCs can provide significant benefits. In this guide, we’ll walk through the steps in Microsoft Intune to adjust provisioning settings, move existing Cloud PCs to a new region, and discuss the benefits, timing considerations, and impact on users.

Why Change the Region of Your Windows 365 Cloud PCs?

Changing the region of your Cloud PCs offers several advantages:

- Enhanced Performance: Placing Cloud PCs closer to your users helps reduce latency, leading to faster load times and better responsiveness.

- Compliance and Security: Many organizations must store data within specific geographic regions to meet local compliance requirements, making regional adjustments essential.

- Cost and Management Efficiency: Selecting a region that aligns with your company’s resources can also lead to better management practices and potentially lower costs over time.

Steps to Update the Region for Windows 365 Cloud PCs in Intune

Before you start, ensure you have the necessary access to the Intune admin center and permissions to modify provisioning policies.

Step 1: Access the Provisioning Policies

1. Log in to the Microsoft Intune admin center.

2. From the main dashboard, go to Devices and select Windows 365 under the Provisioning section.

3. Choose Provisioning policies and pick the policy that applies to the Cloud PCs you plan to move

Step 2: Modify General Settings

1. Inside the policy settings, locate the General section.

2. Click on Edit to make changes.

Step 3: Update Join Type Details

Next, adjust the Join type details based on the current configuration of the Cloud PCs.

- For Hybrid Microsoft Entra Join:

  - Modify the Azure Network Connection (ANC) settings.

- For Microsoft Entra Join:

  - You have a few options to consider:

    - Switch Network Type: Change between ANC and Microsoft hosted network if necessary.

    - Adjust Region and Geography: If using a Microsoft hosted network, update the Region and Geography fields to reflect the new location.

    - Update ANC Settings: If an Azure network connection is in use, update the ANC configuration to match the new region.

Step 4: Confirm and Save Changes

1. After making the necessary adjustments, select Next to review.

2. Once you’ve confirmed everything, click Update to apply the changes to the provisioning policy.

Step 5: Apply Region Changes to Existing Cloud PCs

When you’re ready to move existing Cloud PCs to the new region, select the Apply region change to existing Cloud PCs option. This action will initiate the process of transferring Cloud PCs to the updated location.

Move Process Overview

Once you initiate the move to a new region, Microsoft manages the migration in several steps, helping to minimize disruption for end-users:

1. Backup of Cloud PCs: All selected Cloud PCs are backed up automatically. This backup phase can begin while users are actively using their Cloud PCs, ensuring minimal disruption at the start.

2. Shutdown of Cloud PCs: After backup is complete, each Cloud PC will automatically shut down, preparing for the region change.

3. Cloud PC Transfer: During the transfer, which may take several hours, the Cloud PCs will be inaccessible. 

4. Monitoring Progress: You can monitor the migration progress from the All Cloud PCs list in the Intune admin center. The process is complete when the status updates to Provisioned.

5. User Access: Once the transfer finishes, users can sign back in and continue working as usual, with all data and settings preserved.

6. Error Handling: If any issues occur during the migration, administrators can retry the move to complete the transfer successfully.

Timing and User Impact During the Move

When to Apply Region Changes

To minimize disruption, consider scheduling the region update during off-hours or other times of low activity, such as weekends. This reduces the likelihood of downtime impacting productivity.

User Experience During the Change

1. Temporary Downtime: Users will experience brief access interruptions while the move is in progress.

2. Network Adjustments: Changes in region may impact network settings or VPN configurations. Confirm any necessary network updates post-move.

3. Preserved Data and Settings: Data and settings remain intact, though users should save any ongoing work before the move begins.