Wednesday, July 24, 2024

W365: Screensaver policy cause of frequent disconnects in cloud pc's

Earlier in my previous blog w365: Managing Cloud pc frequent disconnects due to idle session timeout 

I have explained about the frequent disconnections if the cloud pc is idle without any activity for 15mins and how to overcome it using the settings catalog and setting the idle session limit for Device.

Even after increasing the limit, our users started to complain again that they are seeing their cloud pc's are disconnecting if they leave them idle with no activity for 15mins.

Upon checking with the policies applied,  we found that it may be caused by the screen saver policy which was set to 900s and applied to all devices including the w365 cloud pc's.


Also the Interactive Logon Machine Inactivity Limit is set to 900s (15minutes)


Solution: We created an group for the w365 cloud pc's and added it to the exclusion group in the screensaver policy that had 900s.

Created a separate policy that has 1800s (30 minutes) as inactivity limit and added the group that has the w365 cloud pc's. 

Thanks to Marius Muntean for pointing out about my previous blog and asked to check out other settings like device idle lock/Screensaver settings which might be the cause of the frequent disconnection if session is idle with inactivity for 15mins.

Referencehttps://gpsearch.azurewebsites.net/#100

W365: Display Crowdstrike affected cloud pc Report in Intune

In this blog post,  we will see how to check report that shows the windows 365 cloud pc's that are affected by the Crowdstrike update issue. 

Open Intune and navigate to Devices and in the overview page you can see the cloud PC Performance. Under that there is a report named Devices with connection Issues. Here all the cloud pc's that are having connectivity issues will be listed. Also the cloud pc's that are affected by the Crowdstrike update will also be listed here.


You can check this by checking the Host Health status. If it shows as "ErrorResourceUnavailable" or "ErrorResourceUnavailable_CustomerInitiatedActions" , then at present the cause will be the Crowdstrike issue. This may not be all the time, but at present we can guess that CS might be causing this connectivity issue.


PowerShell scriptWindows365-Scripts/Windows365-Report/Crowdstrike_affected_Unhealthy_cloudpc's.ps1 at main · app2pack/Windows365-Scripts · GitHub -**kindly test before use**

Once you have the cloud pc's identified, you can perform the restore option which I have detailed in my previous blog - W365 : Recovery from Crowdstrike BSOD using restore points | Windows 365 & Intune Management (app2pack.blogspot.com)

Sunday, July 21, 2024

W365 : Recovery from Crowdstrike BSOD using restore points

Now that crowdstrike update have caused a huge caos around the world,  Windows 365 cloud pc's were also impacted. Though 2-3 restarts fixed for most cloud pc's,  some couldn't recover and started displaying below error when accessing. 

"We couldn't connect because there are currently no available resources. Try again later or if this keeps happening ask your admin or tech support for help"


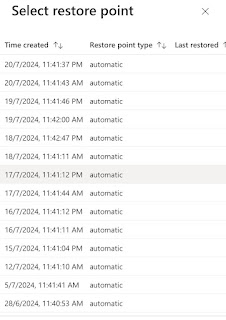
Restoring your Windows 365 Cloud PC to a previous known working state can be a lifesaver when troubleshooting issues or undoing unwanted changes. With Intune, managing and restoring to a specific restore point is straightforward. Follow these steps to utilize up to 14 available restore points for your Windows 365 Cloud PC.

Prerequisites

- Ensure you have administrative access to Intune.

- Verify that your Windows 365 Cloud PC has restore points created.

Step-by-Step Guide

1. Log in to the Intune Admin Center

2. Select Your Device

   - Go to Devices > Windows 365.

   - Select the specific Cloud PC you want to restore.

3. Access the Restore Points

   - In the device overview pane, click on Restore tab


   - You will see a list of available restore points. Note that up to 14 restore points may be available, depending on the device's configuration and usage.

4. Choose the Restore Point

   - Review the restore points by date and description to find the desired state prior to CS impact. 

   - Select the restore point you want to use.

5. Initiate the Restore Process

   - Click on Restore

   - Confirm your choice when prompted. This will start the restoration process to the selected point.

6. Monitor the Restoration

   - The Cloud PC will undergo the restoration process. This might take some time, depending on the size of changes and data involved.

   - You can monitor the progress through the Intune admin center.

7. Verify the Restoration

   - Once the process is complete, log in to the Cloud PC to verify that it has been restored to the desired state.

Important Considerations

Data Loss: Restoring to a previous point will undo changes made after that point. All apps,  data will be lost during this restore to previous state. 

Official source - https://learn.microsoft.com/en-us/windows-365/enterprise/restore-overview

CS BSOD recovery tool

CS BSOD recovery tool

This tool  from Microsoft will avoid the manual steps that we do in cmd prompt. This will also require bitlocker recovery key. 


This tool can be used in to speed up the recovery by just omitting the manual cmd commands.

Wednesday, July 10, 2024

w365: Windows installer repair now prompts for UAC

Recently there have been a change in behaviour for Windows Installer application repair option. It started prompting for UAC. Earlier this doesn't use to happen.

So what happened?

In the July 2024 OS updates for Windows 10/11

July 9, 2024—KB5040427 (OS Builds 19044.4651 and 19045.4651) - UAC is now required for windows installer repair option and applicable to below 

Windows 10, version 21H2 editions
Windows 10 Enterprise LTSC 2021 and 
Windows 10 IoT Enterprise LTSC 2021

Earlier when you click on a Windows installer application for repair, the User Account Control (UAC) does not prompt for your credentials.

After you install this update, the UAC will prompt for users.

To turn off the UAC prompt, set the HKEY_LOCAL_MACHINE\SOFTWARE\Policies\Microsoft\Windows\Installer\DisableLUAInRepair registry value to 1.

Update (14/07/24): This also seems to impact windows 11

https://support.microsoft.com/en-gb/topic/july-9-2024-kb5040435-os-build-26100-1150-954078e3-6c6b-4b6d-885e-f5aa534524a6

https://support.microsoft.com/en-gb/topic/july-9-2024-kb5040442-os-builds-22621-3880-and-22631-3880-0864308e-61cc-413b-8194-0294331aba52


Monday, July 8, 2024

w365 - How to allow local admin access inside windows 365 cloud pc

Enable Local Admin user settings:

Open Intune and navigate to Devices>Windows 365>User settings and click on Add button and turn on Enable Local admin settings to Yes and assign it to the group that contains the cloud pc's for which local admin access needs to be enabled.


PowerShell Scripts:

Windows365-Scripts/W365-AdminPrompt at main · app2pack/Windows365-Scripts · GitHub

Windows365-Scripts/W365-AdminPrompt-SystemContext.ps1 at main · app2pack/Windows365-Scripts · GitHub

Saturday, July 6, 2024

Intune & macOS management - Couldn't add your device. Your IT support doesn't allow OSX devices to be added to management

After creating Apple MDM push certificate in Intune portal and while testing in the macOS device, after you install the company portal and login and try to enrol, the app shows error as 

"Couldn't add your device.

Your IT support doesn't allow OSX devices to be added to management." 


First step is to check in Intune portal - devices - enrollment - monitor - enrollment failure for any entry for the affected user.


In this scenario, the issue was due to the device type restrictions that was blocking the macOS devices.

Solution:

Open intune portal -  Devices - Enrollment - click Apple.

Select device platform restrictions and switch to MacOS restrictions tab.

Your administrator would have created a device restriction to block the enrollment of MacOS earlier. If there are multiple restrictions created for devices open one by one and make sure the macOS platform is allowed for enrollment. 

When you edit the restrictions and go to the properties and under platform settings, you can find out whether the macOS devices are allowed to enroll or if they are blocked.

Wednesday, July 3, 2024

W365: Last connected state shows incorrect date

In the windows app, if you try to access a cloud pc, the last connected info displays wrong information. Below screen shows last connected as 1 day ago. whereas, in fact the cloud pc was accessed and closed few minutes before to accessing as a new session.


Also in the browser session, the information is displayed 19hrs ago. This in-fact should show as few minutes before as even in the browser, the cloud pc was accessed and closed some minutes ago.

I believe it's taking quite sometime to get updated in the backend which shouldn't be the case and should get updated quicky to avoid confusion.

This seems to be a bug  in windows app which I have raised as a feedback. Kindly upvote to get Microsoft visibility on this.

https://feedbackportal.microsoft.com/feedback/idea/5ff778b4-1f3d-ef11-a296-000d3a044d12

Note: The browser session seems to fetch the last connected state some what quicker than the windows app once the cloud pc is disconnected. The windows app still displays wrong info.

Update (10/07/2024):

Had raised a support ticket and we had this tested out.It seems the windows app displays the last connected time in UST but the browser displays in local time. I have cross checked and it’s correct that the Windows app display last connected in UST time.

Have asked Microsoft support that this needs to be shared in Microsoft article that the windows app will display last connected state in UST format or else add the UST at end of the time stamp in windows app, so that user will be aware of this. 

This will avoid confusion and the user will understand if UST is added at end of time in the last connected in windows app.